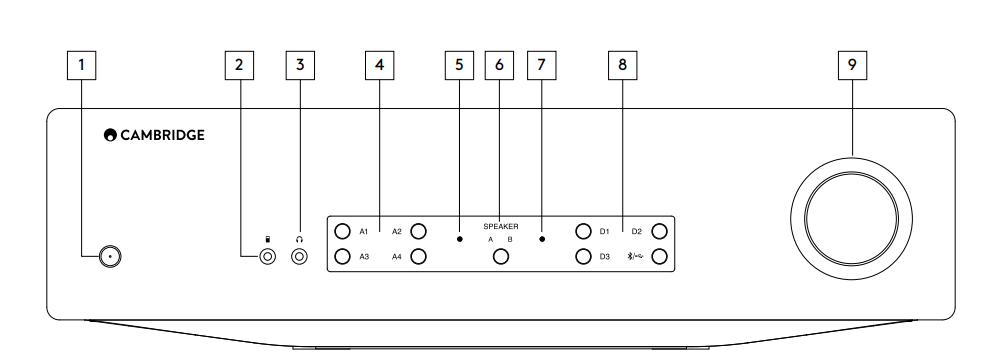
1. Standby/On - Switches the unit between Standby mode (indicated by dim power LED) and On (indicated by bright power LED). Standby mode is a low power mode (0.5 Watts). The unit should be left in Standby mode when not in use.
The CXA has Auto Power Down (APD) enabled by default, and the unit will automatically switch to standby after 20 minutes of inactivity. See the 'Setup menu' section for further details.
2. MP3 input (CXA61 only) - Allows you to connect a portable audio device, such as a smart phone, directly into the front of the unit using the 3.5mm stereo-jack.
Note: The MP3 input can only be selected when a jack is inserted. Plugging in a device into the jack socket automatically selects the MP3 input. With the jack inserted pressing the A4 button will toggle between A4 and MP3 inputs. The MP3 input is shown by A4 being lit orange.
3. Headphones - Allows for the connection of stereo headphones with a 3.5mm jack plug. Headphones with an impedance of between 8 and 600 ohms are recommended.
Note: Plugging in headphones will automatically mute the loudspeaker, pre-out, and sub outputs.
4. Analogue source select buttons - Push the appropriate input selection button to select the source you want.
Notes:
- On the CXA81, pressing the A1 input selection button will toggle between balanced and unbalanced. The balanced input is shown by A1 being lit orange, while the unbalanced input is shown by A1 being lit blue.
- There will be no sound from the amp if the correct input button isn’t selected. If an audio source is connected to the balanced input, for example, ensure that the A1 input light is lit orange.
5. Protection indicator - See the 'CAP5' section for further details.
6. Speaker A/B - Press to scroll through the speaker sets connected to the loudspeaker terminals on the back panel (speaker sets A, B or A and B). This can be used for listening to an extra set of loudspeakers in another room. See the 'Connections' section for further details.
7. Mute indicator - The light will flash to show the outputs are muted.
8. Digital source select buttons - Push the appropriate input selection button to select the source that you wish to listen to.
Notes:
- Pressing the Bluetooth/USB button will toggle between the two inputs. The USB Audio is shown by the symbol being lit orange and the Bluetooth source is shown by the symbol being lit blue.
- There will be no sound from the amp if the correct input button isn’t selected. If an audio source is connected to the USB Audio input, for example, ensure that the Bluetooth/USB button is lit orange.
9. Volume - Use to increase/decrease the level of the sound from the outputs of the amplifier. This control affects the level of all outputs.