Initial setup
- Connect your chosen digital audio source(s) to the input(s) on the DacMagic 200M via:
TOSLINK optical - which offers high quality transfer over shorter distances
OR
S/P DIF coaxial - which can be used for longer connections
OR
USB audio to connect to a PC, or Mac.
- Connect the audio outputs to the line-input of your amplifier using the unbalanced RCA connections for shorter distances, or the balanced XLR connections for longer distances.
- Using the appropriate plug for your region, connect the supplied power adaptor to the DacMagic 200M.
- Power on the unit and select the input source that you wish to listen to using the source button located on the front panel.
Note: For Bluetooth connections, please follow the instructions from the Bluetooth section of the manual.
If there is no power to the unit, please see the following steps
- Check that the supplied 12V PSU is securely connected to the power adaptor socket on the rear of the DacMagic 200M.
- Confirm that the PSU is securely connected to the mains socket, and that the socket is switched on.
If a hum or buzzing sound can be heard after setup, please see the following steps
- Check that all connections between Source(s) > DacMagic 200M > Amplifier are secure.
- Move the unit away from any nearby lighting, or mains cables that could cause interference.
- If connected to a PC or Mac via USB, switch ‘Ground Lift’ switch to ‘lift’.
Audio output connections
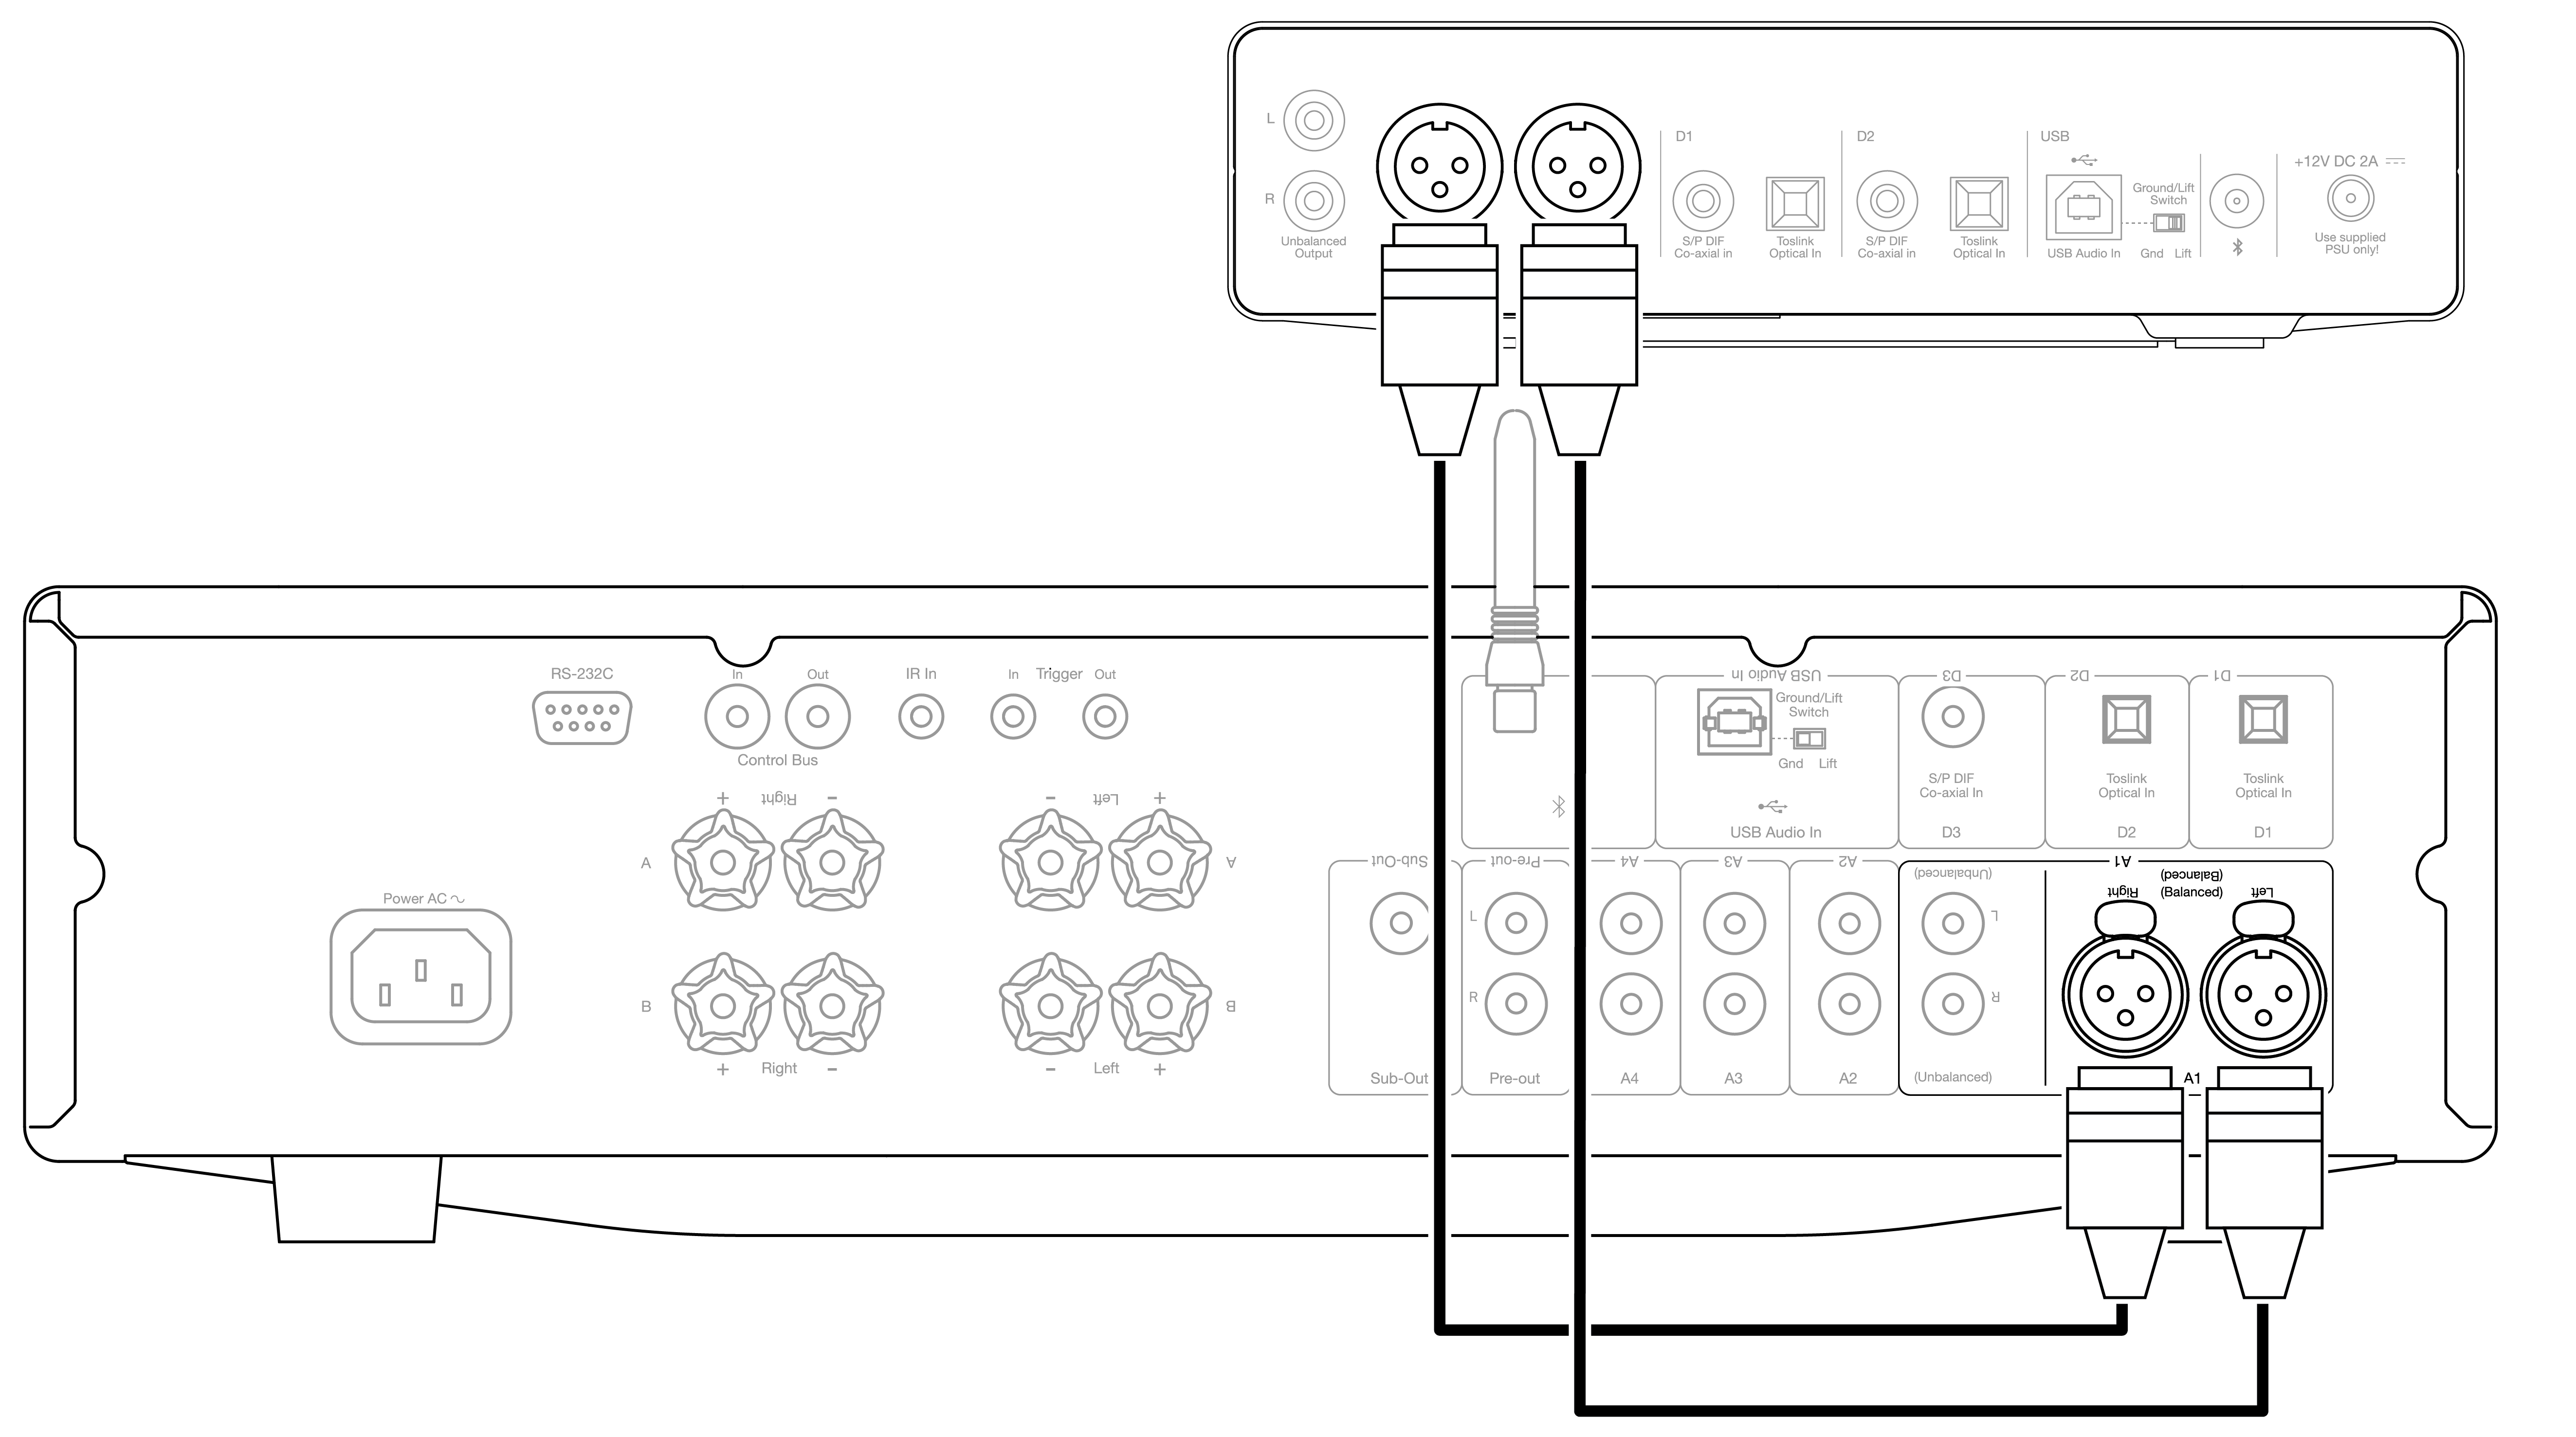
Balanced connection to a CXA81
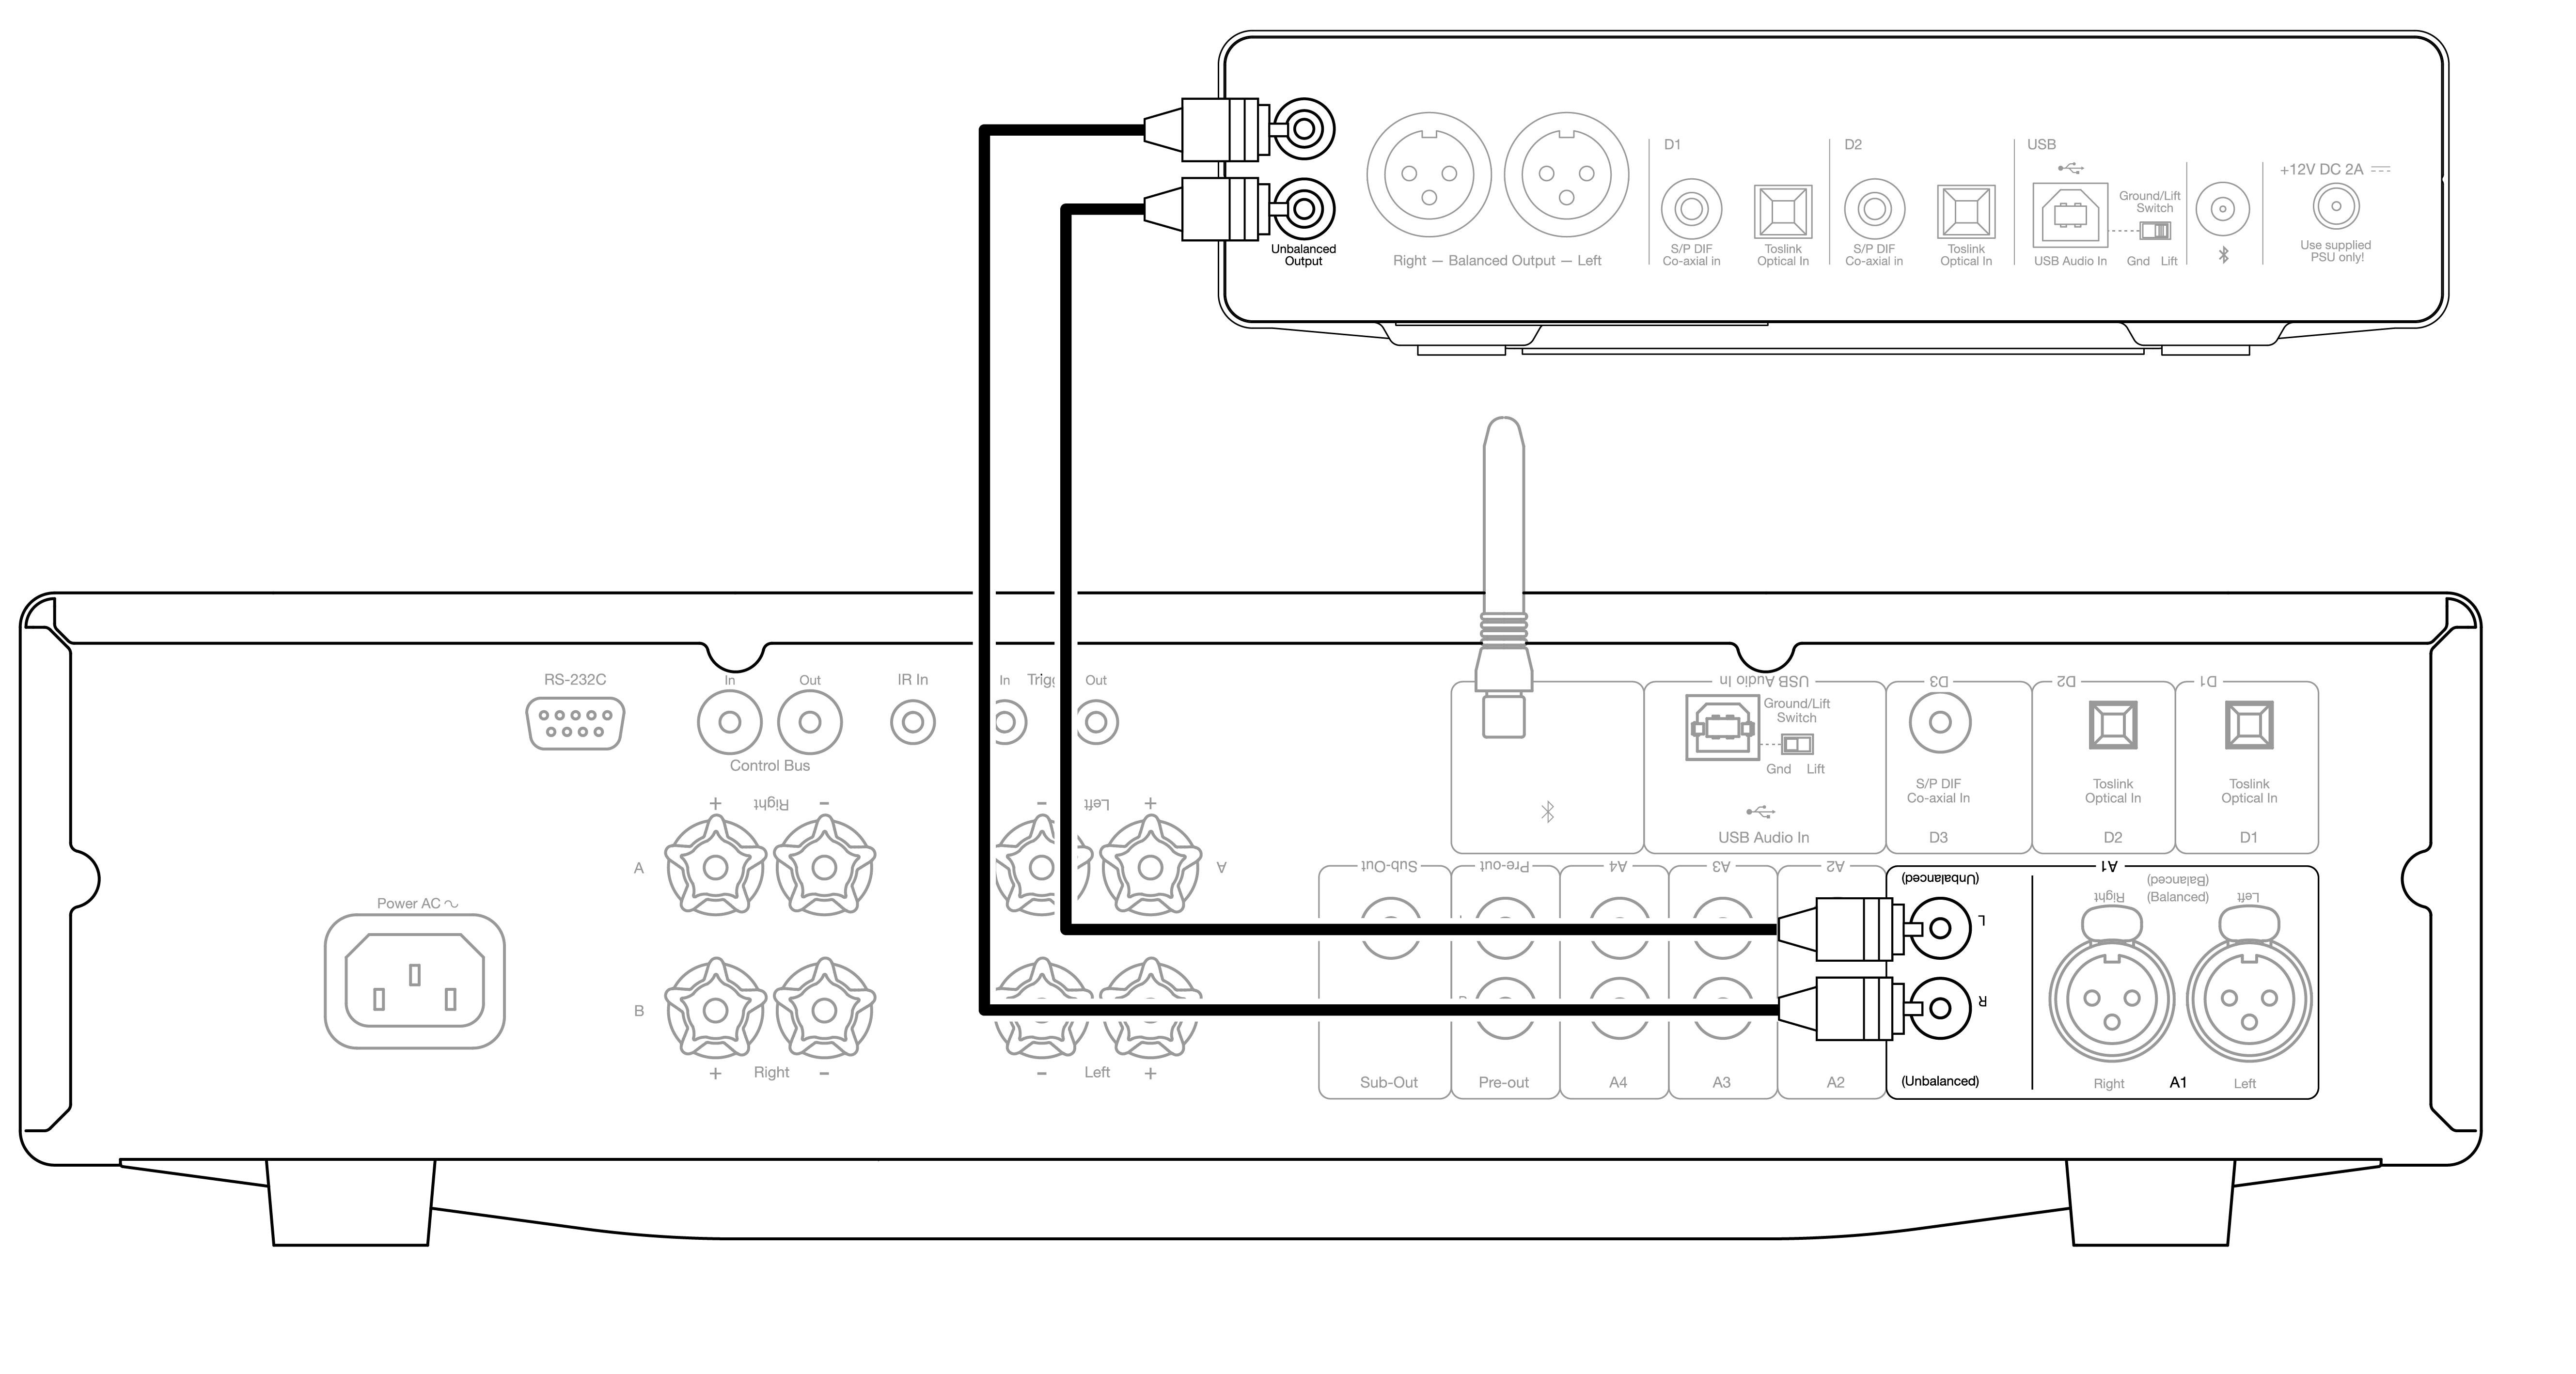
Unbalanced connection to a CXA81
Note: Do not turn the unit on until all necessary connections have been made.
The DacMagic 200M offers both balanced (XLR), and unbalanced (RCA) audio output connections.
In the case of longer connections between the DacMagic 200M and your amplifier we would recommend the use of a balanced connection via XLR as this can help to reject noise, and interference in the cable.
It is possible to use both balanced, and unbalanced connections at the same time, for example: when connecting to multiple amplifiers, or a multi-room setup.
Digital audio input connections
Connection to a CXC using S/P DIF coaxial

Connection to a Smart TV using TOSLINK optical
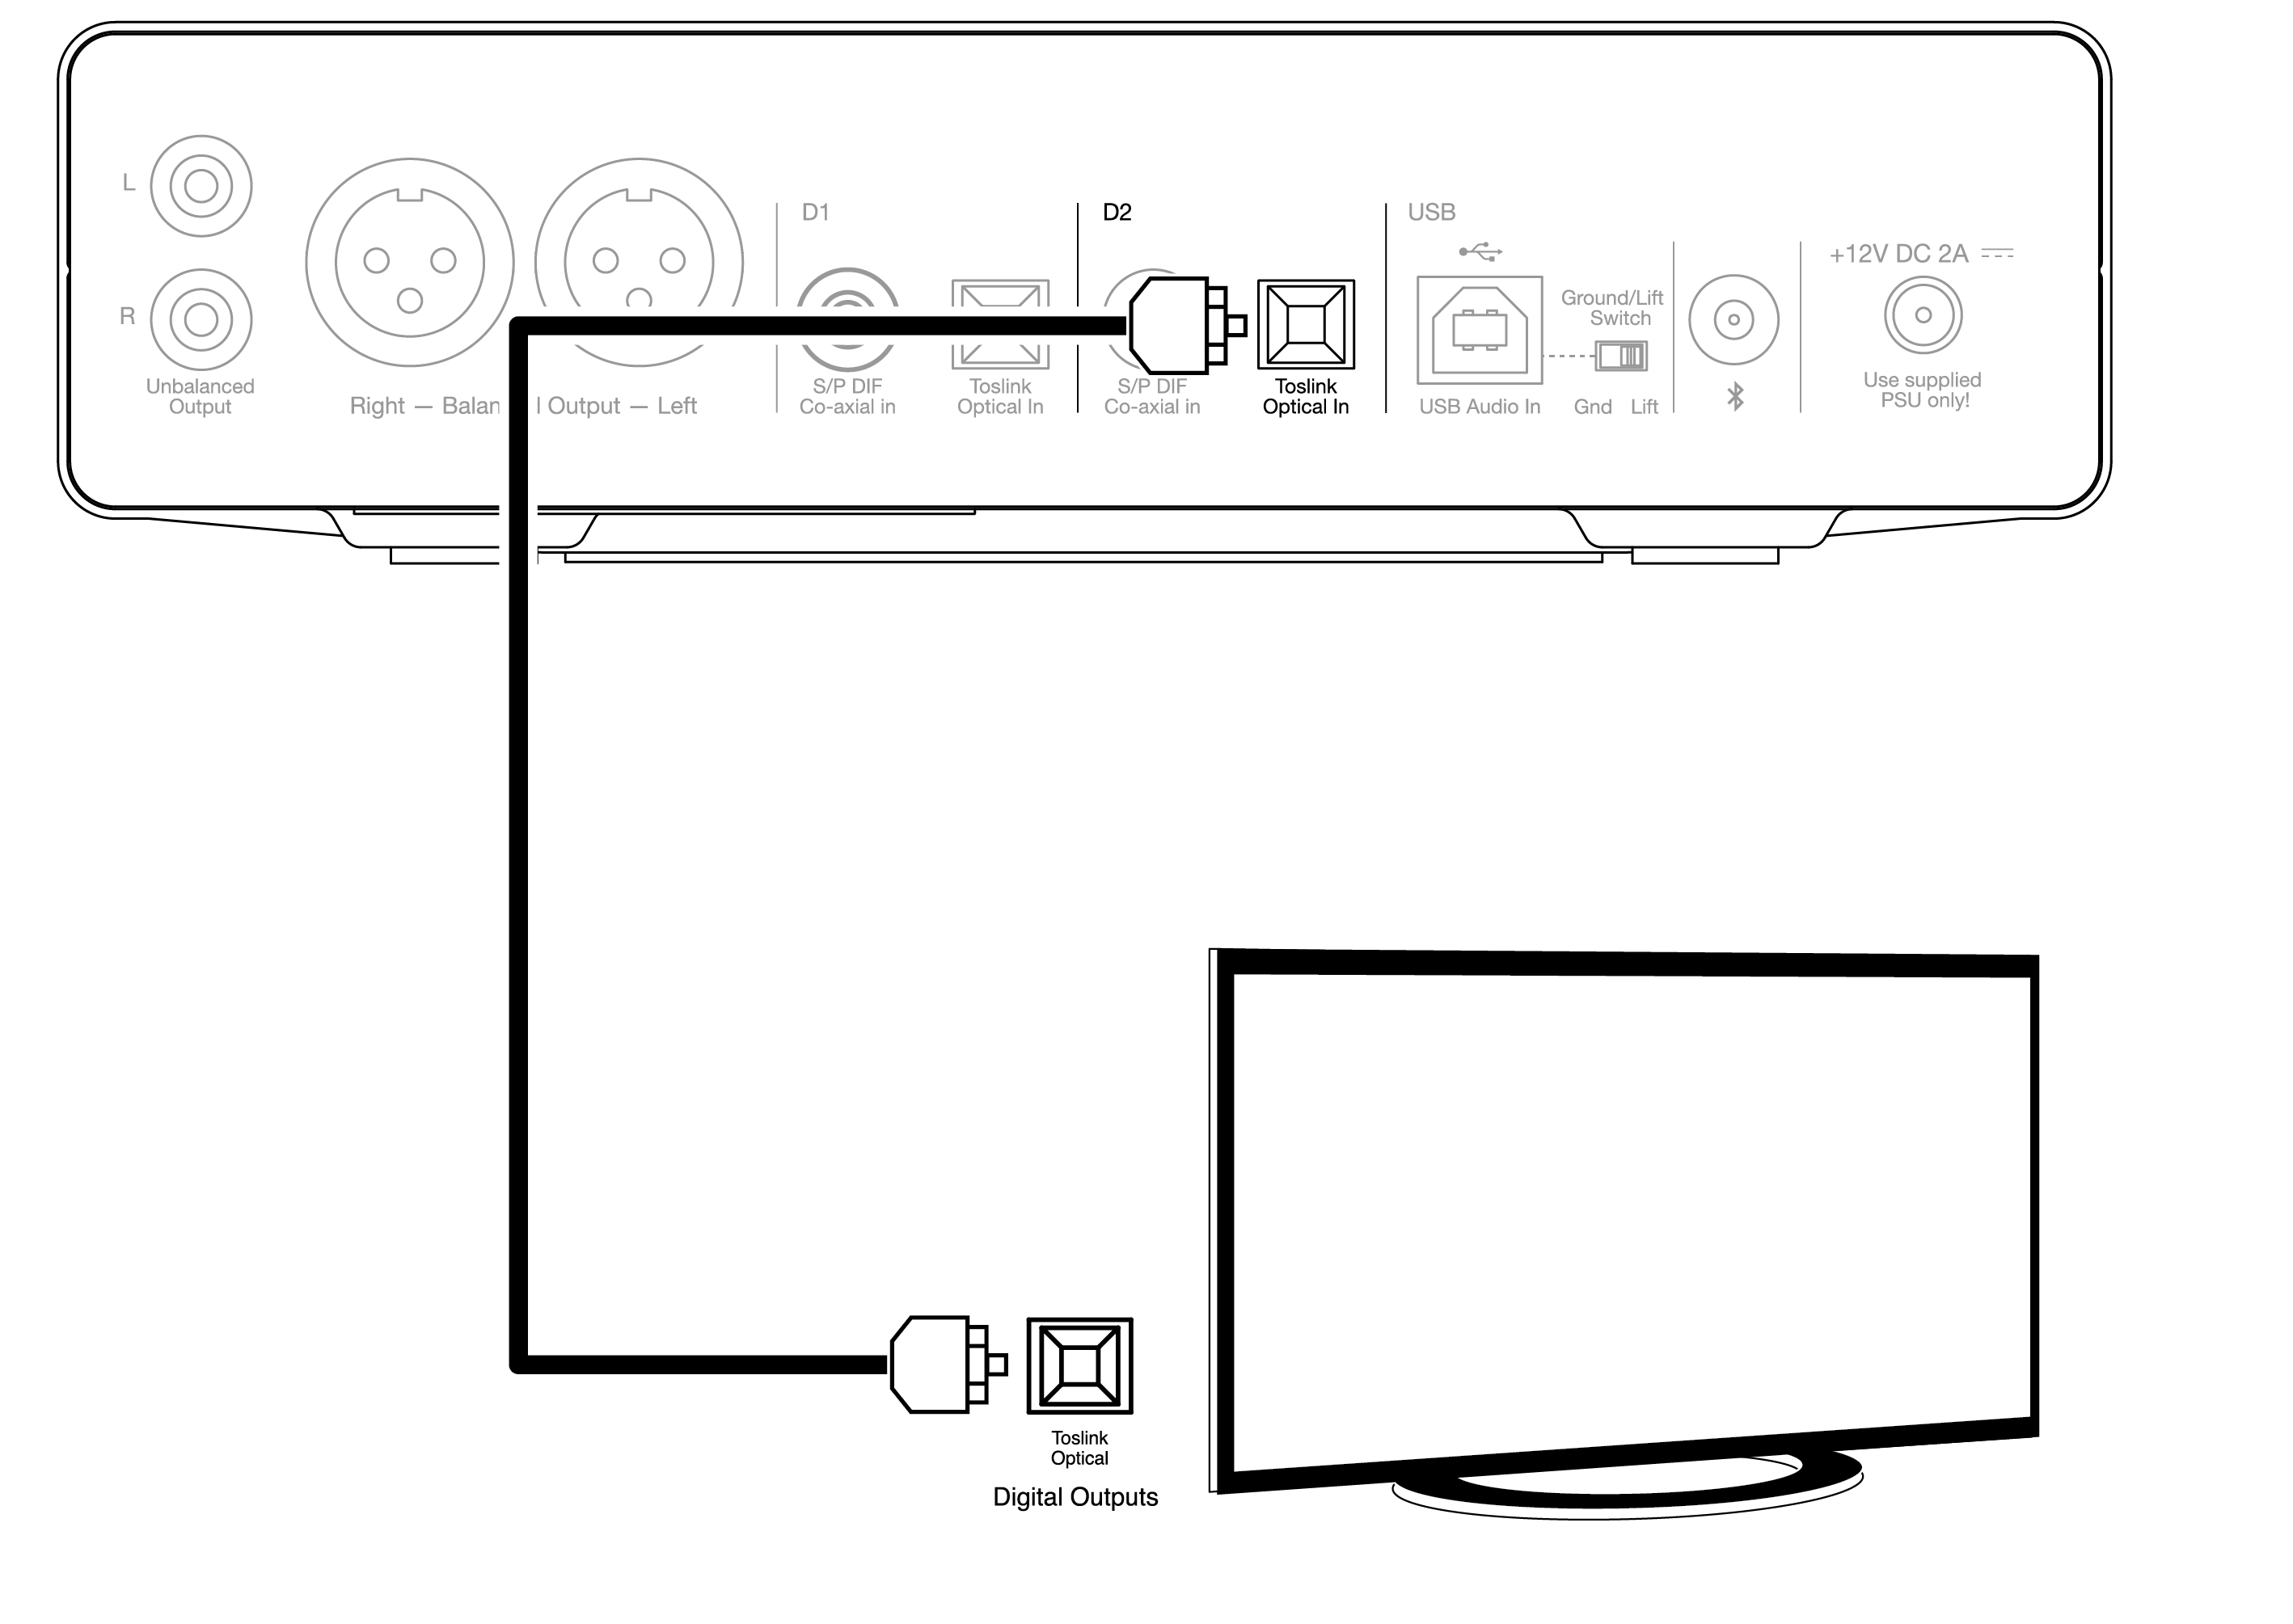
Important Note: Only connect one co-axial OR optical cable to each digital input. The unit will not operate properly if both connections are made (even if only one is active).
This unit only accepts two-channel LPCM/Stereo PCM digital audio, and cannot be used with Dolby Digital 5.1, or DTS signal. If connecting a DVD/BD player, a smart TV or similar device please ensure that the output is set to two-channel PCM.
If there is no sound output once the input, and output connections have been made, please follow the steps below:
- Check that the interconnects between the DacMagic 200M, and the amplifier are securely connected.
- Confirm that the correct incoming source is selected via the corresponding LEDs on the front panel of the DacMagic 200M.
USB audio connection
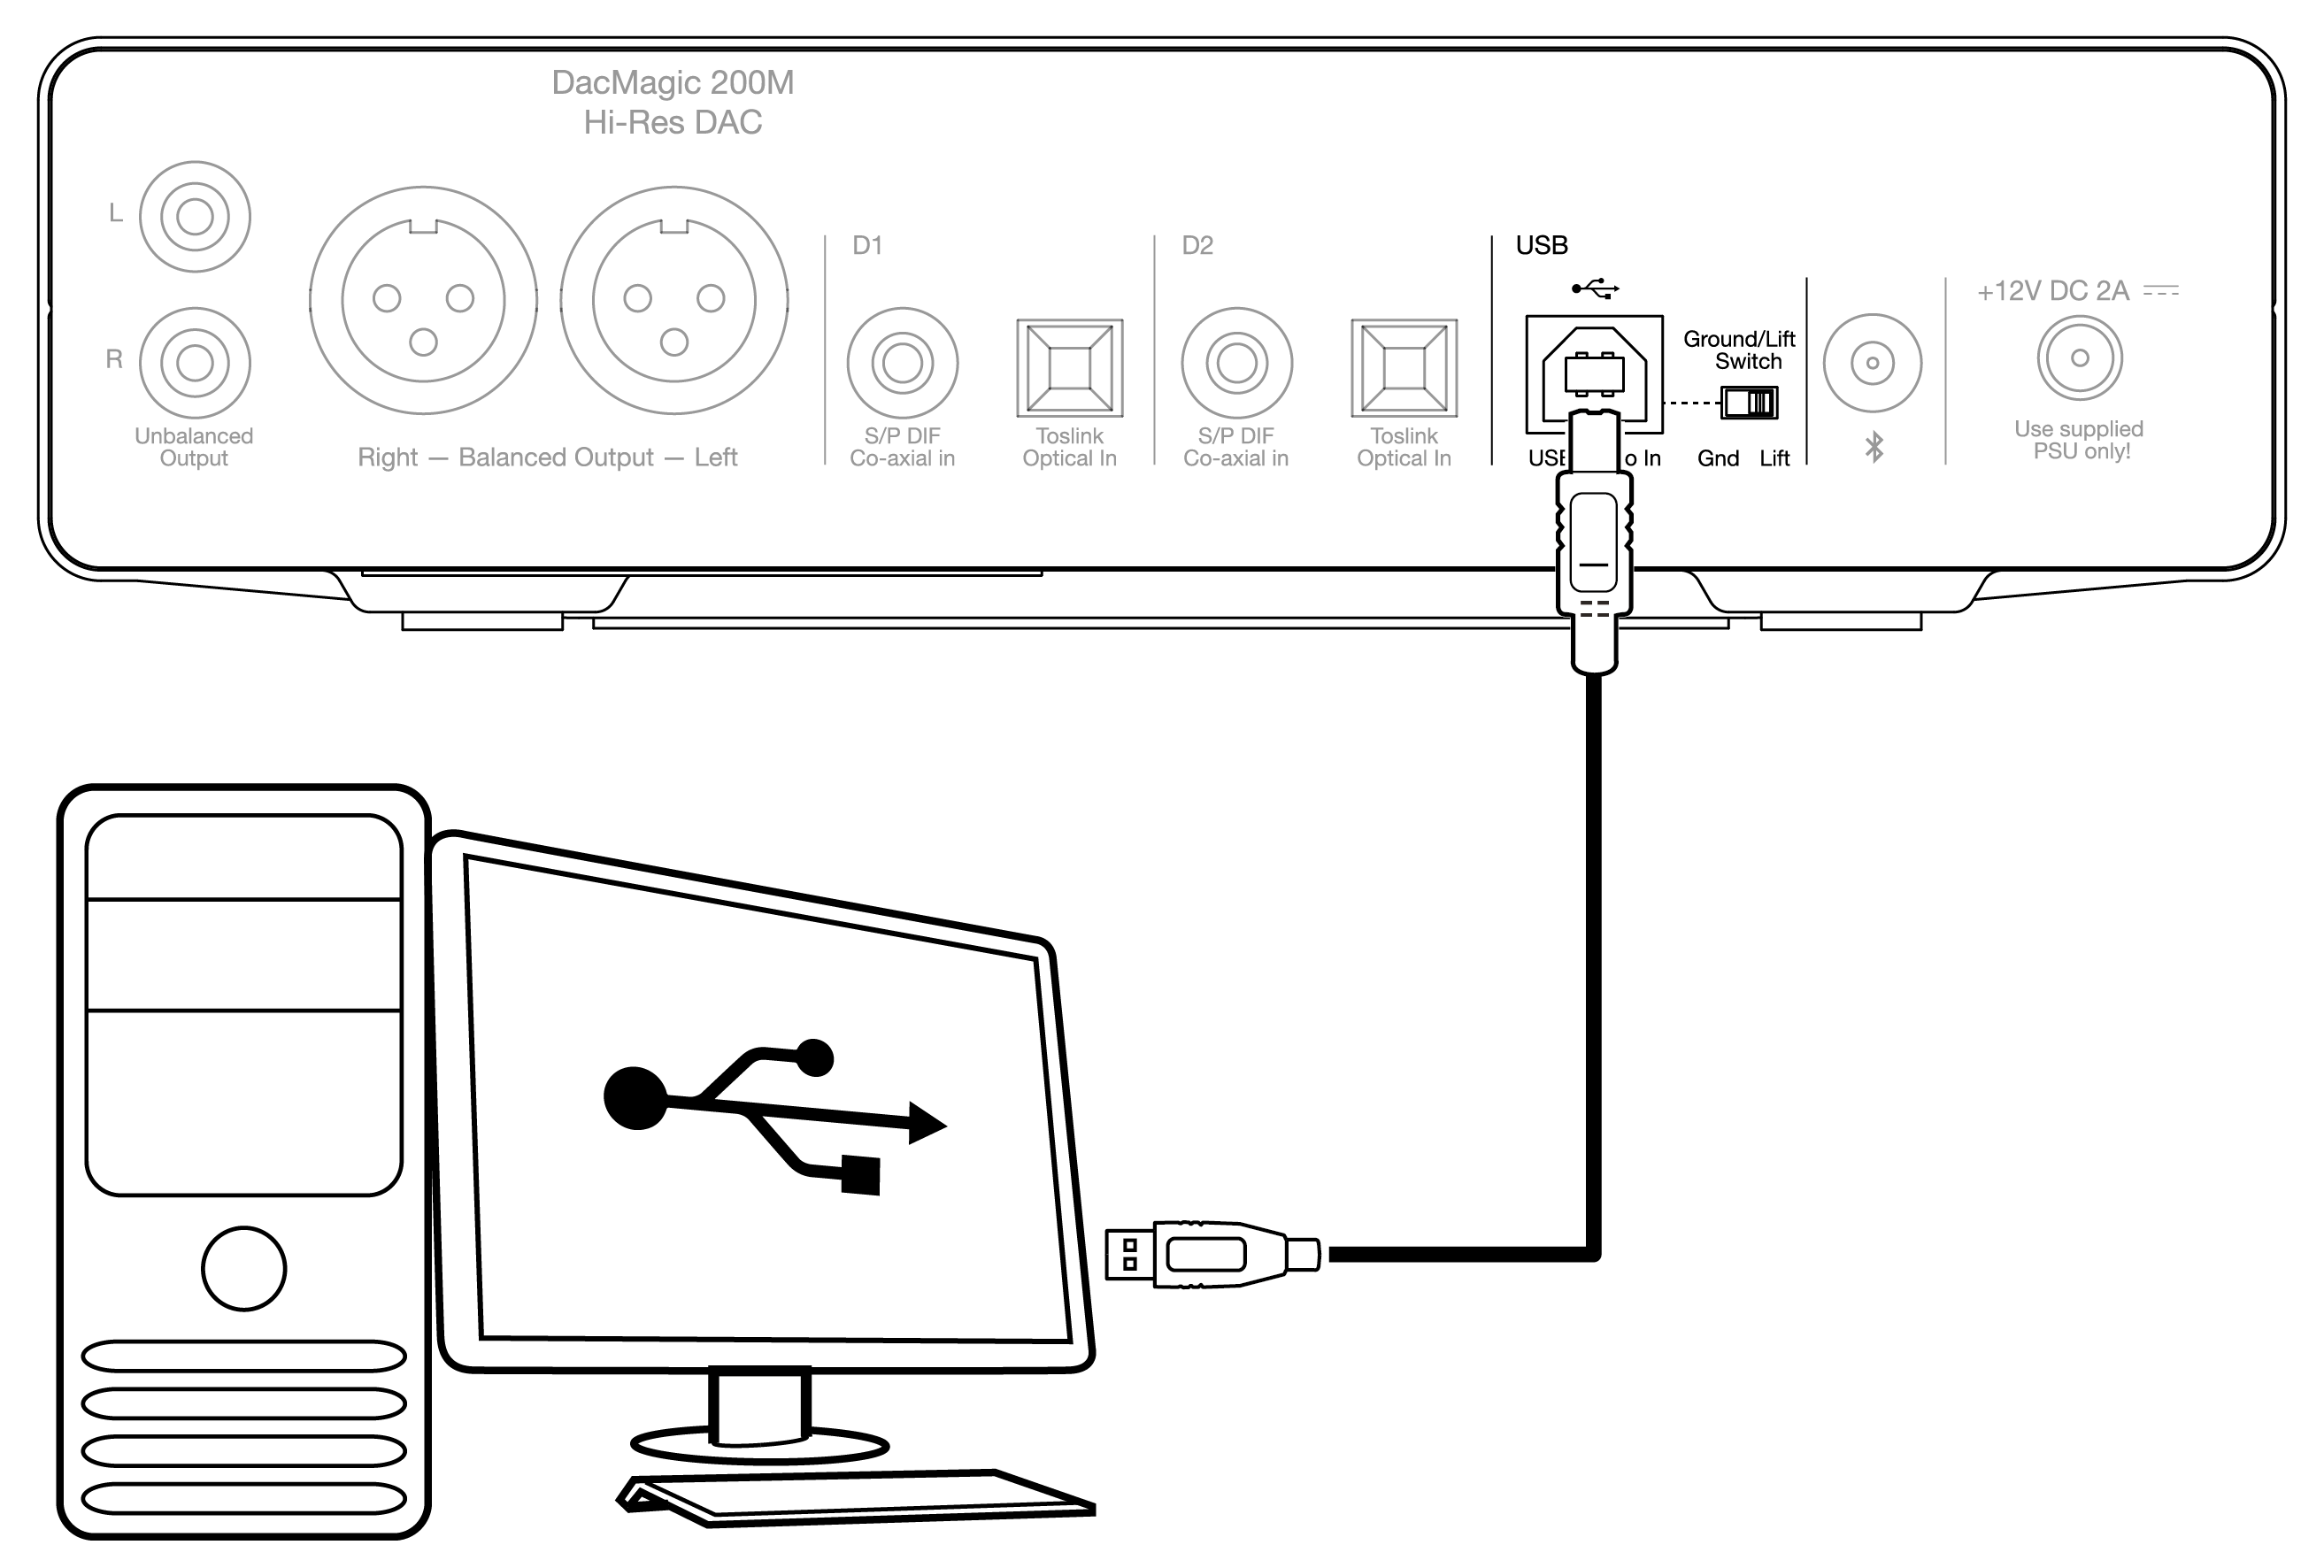
The DacMagic 200M only supports USB audio playback using USB Class 2.0 Audio. For this it is required that the DacMagic 200M is connected to a USB 2.0 port using a suitable USB cable, and we would recommend any USB certified high-speed USB 2.0 ‘A–B’ cable.
Use with Windows PCs
For use with Windows PCs, you will need to install the Cambridge Audio USB Driver to be able to play audio via USB Audio Class 2.0. More information regarding the download, and installation of the driver can be found here:
https://www.cambridgeaudio.com/gbr/en/driver-updates
Use with Mac
DacMagic 200M is compatible with Macs without the need for extra drivers.
Use with Linux
Due to the many configuration options and target hardware, we cannot say that Linux is officially supported by the DacMagic 200M.
However, most recent Linux distros are supporting USB Audio Class 2.0 natively, so the DacMagic 200M should work without any specific action required.
Ground/Lift switch
The DacMagic 200M includes a ‘ground/lift’ switch on the rear panel. When connected via USB, and with the switch set to ‘ground’, the DacMagic 200M will ground itself via the USB connection. Setting the switch to ‘lift’ will ground the device via an internal network to reduce any potential hum in case of ground loops.
The switch should be left in the “ground” position unless a hum or noise is heard from the system.
In some instances, the use of audio grade USB cables can cause compatibility issues, and the introduction of glitches. This is because the cable may not fully adhere to USB standards. If you are experiencing noise, hum, or glitches whilst connected via USB it may be necessary for you to set the switch to ‘lift’, which will disconnect the ground from the computer connection.
Use with the Apple camera adapter
The DacMagic 200M is not designed for use with mobile devices via wired connection such as an iPhone using the Apple Camera Adapter, or an Android phone using a USB OTG adapter. Therefore, it is not possible for us to guarantee compatibility for a setup of this nature.
In most cases when attempting to use the DacMagic 200M with a mobile device, and an Apple Camera Adapter, the user will receive the following alert: ‘Cannot Use Accessory’.
Bluetooth
Selecting Bluetooth with the source button located on the front panel allows the DacMagic 200M to receive wireless Bluetooth audio from most smartphones, tablets, and laptops.

Pairing
The following procedure will allow you to pair a new Bluetooth enabled device with the DacMagic 200M.
- Make sure that any previously paired Bluetooth devices are turned off (the DacMagic 200M will auto-connect to the last paired device).
- Turn on the DacMagic 200M and select Bluetooth as the source (denoted by the Bluetooth symbol).
- Activate Bluetooth on the desired source device.
- Scan for available devices on the source device and select ‘DacMagic 200M’.
Unpairing
To unpair a device you can select ‘unpair’ in the source unit’s device list. Alternatively, you can perform a factory reset on the DacMagic 200M which will delete all previously paired devices.
Note: Your device can only be paired and connected to the DacMagic 200M whilst the Bluetooth source is selected.
Paired LED status
Once your device is paired, the Bluetooth Source LED will change to denote the type of codec that is being received.
SBC Codec is represented by a solid light.
aptX Codec is represented with a 2-second solid light followed by a very short light off interval.
Headphone
The DacMagic 200M integrates a dedicated headphone amplifier stage for a personal listening experience.
The volume can be adjusted with the front knob, and the volume level will be saved separately from the main output volume (if digital preamp mode is enabled).
Whilst headphones are connected the line out is disabled.